Archive
Hyper-V host blue screens (BSOD) after being added to SCVMM
Description
When rebooting a Hyper-V host running on VMware Workstation after adding it to System Center Virtual Machine Manager (SCVMM), the host will not boot & blue screens (BSOD).
Cause
When a Hyper-V host is added to SCVMM, several hardware IDs are added to the Multi path I/O (MPIO) list. One of these hardware IDs are not compatible on VMware Workstation.
Information
To see a list of hardware IDs added by SCVMM run:
Get-MSDSMSupportedHW

It’s worth noting that when the MPIO role is installed, the only ID in the list is a generic entry for Vendor 8 Product 16.
Solution
Boot the Hyper-V host to the last known good configuration. Once it’s back up, add the Hyper-V host to SCVMM again. Before rebooting, remove the MPIO entry for MSFT2011SASBusType_0xA by running the following PowerShell command:
Remove-MSDSMSupportedHW -VendorId "MSFT2011" -ProductId "SASBusType_0xA"
Now reboot the Hyper-V host.
![]()
Nested VM Performance is Slow
This is taking forever!
That’s what I was thinking when deploying nested virtual machines on vSphere 6.5 in my lab (OK, it’s my laptop). The configuration was simple enough; the latest version of VMware Workstation, an ESXi host VM, & a Windows Server 2012 R2 VM nested in ESXi. Simple enough, right?
Watching the console of the nested VM I notice it seemed…slow. When the VMware logo on the POST screen finally appeared I could see the screen painting making it look like an 80’s arcade game.
As you can see that took way too long. So with Process Monitor running on the laptop I power on the VM again. After it runs for about a minute the fun task of sifting through the ProcMon log begins. If you’ve ever used ProcMon you know it’s more of an art than a science. The first thing I always do is use the analysis tools from the menu.

Honestly, I just go through each of them & see if something jumps out at me. Real technical, I know. In all the sifting & sorting one thing that kept jumping out was the Anti-Virus software.


This wouldn’t be the first time an Anti-Virus product interfered with an application working properly so I started digging through the AV interface. After clicking around for a bit I come across some very interesting settings.

“Enable hardware-assisted virtualization” & “Use nested virtualization where available”. Those look promising. I uncheck both of those settings & give the laptop a reboot. This time when the nested VM boots it POPS!
According to Avast’s website, the software is supposed to detect that virtualization applications like VMware Workstation or Microsoft Hyper-V are installed & automatically disable these settings.
Cheers!
Remove an OEM Recovery/Boot Partition
Warning: This post deals with editing the boot configuration of your computer. If you don’t know what that is stop right here & ask someone else to help you. Editing the boot configuration incorrectly can cause serious problems that may require you to reinstall Windows. Use the steps below at your own risk.
I recently had a situation where Windows Server 2008 R2 was installed on a Dell OptiPlex 7010 that came with an OEM installation of Windows 7. During the Windows Server 2008 R2 installation process all partitions were not properly deleted. The result was that the 10GB OEM recovery partition was left intact which also meant that it remained the boot partition. Fast forward a few months & I needed to P2V the computer. Now I’ve got a VM with 10GB of wasted space & a boot configuration which is a mess.

Now the following steps may vary depending on your situation. As always there are several ways to get the same result. In my case here’s what I did. Note that all commands should be run from an elevated command prompt.
First set the C drive as the active partition. Open Disk Management right click the C drive & select Mark Partition as Active. Now it should look a little more like this.

The issue now is that the actual boot files are on the Recovery drive & boot manager will still look to the recovery partition for the boot files.

Copy the boot file to the C drive by running bcdboot c:\windows /s c:

Just in case make a backup of the boot configuration by running bcdedit /export c:\temp\bcs\backup
Note that the C:\Temp folder needs to exist or you will get an error.
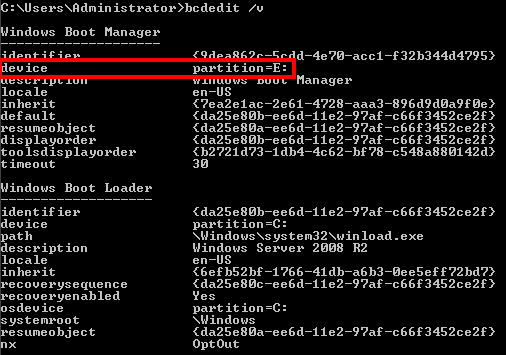
Now set the C drive as the boot partition by running bcdedit /set {bootmgr} device partition=C:
Verify the change by running bcdedit as well as looking at Disk Management.


Unfortunately with the recovery partition being at the beginning of the disk there is not a built-in way (that I’m aware of) to just delete the partition & reclaim the space without the use of 3rd party utilities. In my case the easiest option was to do a V2V migration (virtual to virtual) of the VM. During the process I did not migrate that partition since it is no longer a system partition. Once that is done I booted up the VM. Now no more OEM partition.

Error Using EqualLogic Datastore Manager
UPDATE – 10/23/2013 – After upgrading the HIT Kit from 3.1.1.37 to 3.5.2.1 I am able to use Java 1.7 Update 45 without issue.
The Dell Host Integration Tools for VMware (often called the HIT kit) are a set of vSphere Plug-ins that assist in doing a lot of storage realted tasks on an EqualLogic SAN from within the vSphere client.

Recently I ran into an issue when using the EqualLogic Datastore Manager plug-in to create a new datastore. I first noticed an issue when the navigation pane on the left was stuck showing “Retrieving data…”.

I clicked on Create Datastore & got the same “Retrieving data…” message on the first screen of the wizard.

The message is due to a Java issue. Turns out it doesn’t work if you have the latest version installed which is 1.7 update 7 at the time of this writing. You have to downgrade to 1.6 update 35 which is the latest as of this writing. Then it starts working again.


So in conclusion…
Java is THE WORST software EVER. Worse than Adobe Reader & Flash. Everyone always talks about it like it’s so great because it’s cross-platform & runs on everything & blah-blah-blah. Yeah, that’s all great until you have to update it. And that’s the problem. It’s constantly being updated because it’s just one big security vulnerability. But you can’t update it to protect yourself because then all these Java applications stop working because these Java programmers can’t come down from their pedestal to fix their shitty software. You may think your language is so superior, but you should probably talk to a few System Administrators & ask them how great they think it is. We’re the ones that have to deal with your incompetence.


Visitors

