Archive
Remove an OEM Recovery/Boot Partition
Warning: This post deals with editing the boot configuration of your computer. If you don’t know what that is stop right here & ask someone else to help you. Editing the boot configuration incorrectly can cause serious problems that may require you to reinstall Windows. Use the steps below at your own risk.
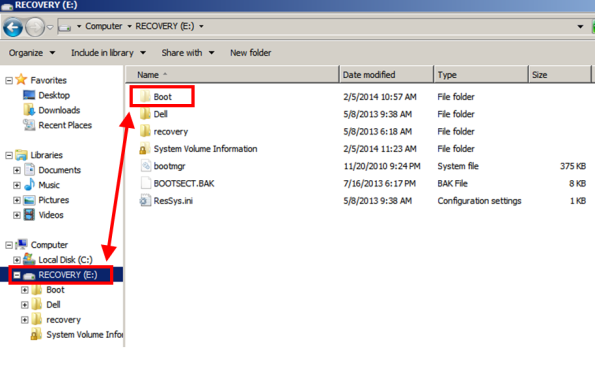
I recently had a situation where Windows Server 2008 R2 was installed on a Dell OptiPlex 7010 that came with an OEM installation of Windows 7. During the Windows Server 2008 R2 installation process all partitions were not properly deleted. The result was that the 10GB OEM recovery partition was left intact which also meant that it remained the boot partition. Fast forward a few months & I needed to P2V the computer. Now I’ve got a VM with 10GB of wasted space & a boot configuration which is a mess.

Now the following steps may vary depending on your situation. As always there are several ways to get the same result. In my case here’s what I did. Note that all commands should be run from an elevated command prompt.
First set the C drive as the active partition. Open Disk Management right click the C drive & select Mark Partition as Active. Now it should look a little more like this.

The issue now is that the actual boot files are on the Recovery drive & boot manager will still look to the recovery partition for the boot files.
Copy the boot file to the C drive by running bcdboot c:\windows /s c:

Just in case make a backup of the boot configuration by running bcdedit /export c:\temp\bcs\backup
Note that the C:\Temp folder needs to exist or you will get an error.
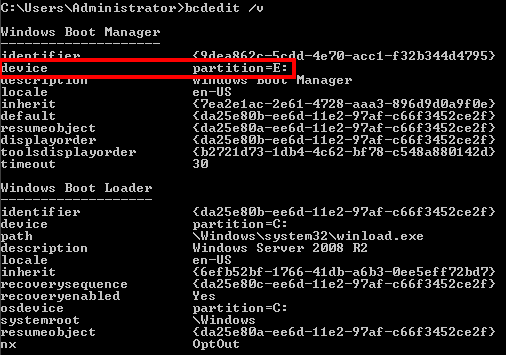
Now set the C drive as the boot partition by running bcdedit /set {bootmgr} device partition=C:
Verify the change by running bcdedit as well as looking at Disk Management.


Unfortunately with the recovery partition being at the beginning of the disk there is not a built-in way (that I’m aware of) to just delete the partition & reclaim the space without the use of 3rd party utilities. In my case the easiest option was to do a V2V migration (virtual to virtual) of the VM. During the process I did not migrate that partition since it is no longer a system partition. Once that is done I booted up the VM. Now no more OEM partition.


Visitors

